There are many programs that you can create objects that looks realistic, and in this article, we'll be showing the readers a very interesting thing! Normally when people are looking for icons or pictures of the cartoons that they want,. Of course people would just Google online the pictures and use it, but there are some picture that they have in their mind and they couldn't find it in the internet, so what to do now? When you don't know how to do now you can look at an example icon that this article is teaching which is "Frozen people in the ice". This is part one, which is just only the ice cube, later in the next article (you can click the word "HERE" down the end of this article and view part two.
Step 1. We need to find a program for creating this and it would be Illustrator CS3 from Adobe then we'll start creating an ice cube by sketching a 3D rectangle shape. Notice that a 3D rectangular has 6 sides, so we need to draw each of the side in different layers so that we could edit them separately later on. 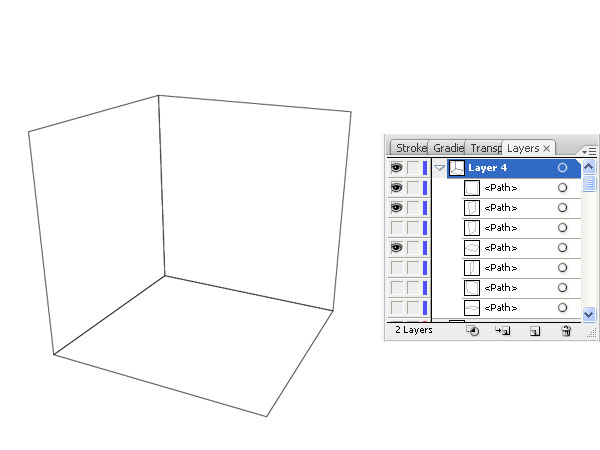
Step 2. After that, we want to start edit just one or two side of the rectangle so we have to hide all the sides that we don't want to edit at this moment by clicking the "eye" icon in the place where you can see all your layers.
Step 3. Since we know that, a realistic ice cube does not have a sharp edge, its not perfectly a rectangle shape, so now we want to make the edges curvy by using Convert Anchor Point Tool. (Don't worry if its overlapping each other).
Step 4. Now we'll start to fill in some colors! We first just need to select one of the side and fill with gradient. Don't worry when you see the color black, it is the default color, all we need to do is just change the color to blue. After you've succeed one side, do the rest sides of the rectangle.
Step 6. Make the faces a little bit transparent color by change the "transparency" into 60% and for the bottom one, 80% is enough (we know that we're highlighting, so the bottom is darker).
Step 8. Even though it look like an ice cube already, but it looks a little bit fake because it doesn't look watery (an ice cube should be looking watery since its made from water). So now, we'll have to select the parts that we want to make it look watery.
Step 9. Draw like an Y shape at the edges of the front sides. After that, we want to fill it with color "white" again we're highlighting. But we don't want the white color to be too solid so now we'll make its transparency to 75%. and select "screen" for the color effects.
Step 10. For the top part we'll make some highlight also but since its at the top, its far away from our sight, so we want to make the color not just transparent but also to add at least a little bit of blue by filling in the gradient color (make sure you're in the blending mode so that the color would blend.
Step 11b. Then fill in the gradient color (white faded with blue + 60% transparency).
Step 11c. Make a smaller oval shape in the oval shape that we just created and give it a gradient of white to cyan color + 30% transparency.
Step 11d. Even though we made the smaller oval shape a transparency of 30% already but still it won't look like is a part of the bigger oval. So we need to blend the colors together, this time we would select the smaller oval's layer and click on effect and select blur > Gaussian Blur. When you select that, there will be a window pop up and ask you to enter a value of how much blur you want, and the best one is 5.
Step 11e. Even though they're now looking like "a" drop of water, we still have to add some highlight since we did add a lot of highlight for the sides. So now create some highlights at the top and the bottom of the oval shape AND also a little dot of highlight that makes this drop more 3D looking.
This is a picture of the icon of frozen people in ice cube. If you want to know how to do the frozen people in the ice click HERE to view the next article on April 1st.
Major Concept:
The reason why this article is interesting is because normally people might just go get ice cube or whatever picture/icon at Google but here you can learn how to make it with your own hands! And the result looks very realistic too. It seemed like there's a lot of steps, but they're just repeating and they're very simple.
Advantage & Disadvantage:
By reading this article, you can learn how to make your own realistic things/object in computer by highlighting and blending etc. Not just ice that needs highlights, all the other realistic object does required this, so after you read this article, I'm sure you could do for other things too!
It takes a bit time instead of just Google it, and if you didn't do well, it might not look as realistic as it is in real life.
Question:
Is it better if we look at a a real life photo of an ice cube and make it according to that photo or a not real life picture such as cartoon? Which one is better? Because the real life picture might be too hard to make and a cartoon picture might be too easy (since some of them doesn't even have any highlights).
Citation:
"Create a Fun Icon of Frozen People on Ice – Part I." Vectortuts RSS. N.p., n.d. Web. 26 Mar. 2013. <http://vector.tutsplus.com/tutorials/icon-design/create-a-fun-icon-of-frozen-people-on-ice-part-i/>.
No comments:
Post a Comment